If you’re building a new home in BC, you’ve probably heard mention of the Mid-Construction Blower Door Test. Some municipalities require it at this point and some don’t. Most builders know it’s a smart step and don’t consider skipping it. Many homeowners or homeowner-builders look at the price tag (usually around $350) and wonder if it’s really necessary.
Short answer: you can skip it, but you really shouldn’t.
Skipping the mid-construction test is one of the most common reasons projects fail Step Code airtightness requirements at the end of construction. And when that happens, fixing it is far more expensive than the test itself.
Let’s walk through what the test is, why it matters, and what is at risk by skipping it.
What Is a Mid-Construction Blower Door Test in BC?
A mid-construction blower door test is performed prior to drywall installation, once air-barriers are in tact. At this point, all the important air-sealing work is visible and accessible to amend.
The test uses a large calibrated fan to pull air out of the home (or force air into the home, depending) and measure how quickly outside air leaks in through the exterior envelope (ceiling, walls, floors, windows). This gauges whether your home is on track to meet the air leakage requirements for Step Code at a point where leakage issues can still easily be addressed.
Certain Municipalities currently require Mid-Construction Blower Door Testing to be completed prior to insulation inspection, for example:
Fraser Valley Regional District
Why Some Consider Skipping It
Homeowner-builders often think:
• Do I really need that if it’s being checked again at the end anyway?
• The crew will just take care to tape and foam everything
• Why spend ~$350 if everything looks good?
The problem is, airtightness is not something you can guess by looking at a wall. Even highly experienced builders get surprised by real test numbers.
A single overlooked penetration, poorly sealed rim joist, or disconnected air-barrier panel can add up quickly. By the time drywall is installed, those issues are locked behind finishes and are costly and annoying to remediate.
What Happens If You Skip the Mid-Con Test?
If you go straight to the final As-Built blower door test and fail, you primarly have two choices:
1. Pull apart finishes
This means undoing finished work, reopening walls or ceilings, and trying to find leaks that should have been caught earlier. Nobody wants this and the costs add up quickly.
2. Pay for AeroBarrier
AeroBarrier is a highly effective air-sealing technology and we recommend it where applicable. It can bring a leaky home into compliance even when typical air sealing hasn’t turned out to be effective. If this is your original plan in your budget for air-sealing, that’s great. If it’s not….
The cost is dramatically higher than a Mid-Con test.
AeroBarrier installation ranges in the multiple thousands of dollars and actual costs depend on the size of the home and air tightness target required to be met. Even in the best case, it’s thousands more than the $350 you saved by skipping the test.
Why the Mid-Construction Test Is Worth It
The mid-construction blower door test gives you:
Confirmation
You know exactly whether you’re on track to meet the required airtightness and if not, what needs to be addressed.
Time to fix issues
If anything leaks, your Energy Advisor can identify it right away while everything is still accessible and sometimes help to address the issues during on-site time.
Peace of mind
No surprises at the end of the build when the final Step Code test determines compliance. This is not the time you want to be rectifying compliance issues.
Cost protection
If something needs to be sealed or corrected, you’re doing it when it’s easiest and cheapest.
Skipping the test might save you ~$350 up front, but It risks costing you thousands + time and stress at the project end.
When the Mid-Con Test Is Most Critical
You should absolutely do one if:
• You are building your own home as an owner-builder
• You have complex framing or lots of penetrations
• You have vaulted ceilings, tricky air-barrier transitions or a multi-storey design
• You’ve never built to Step Code airtightness levels before
• You are aiming for Step 4 or Step 5
• You are building without exterior insulation (where the interior poly is doing all the work)
• You are using multiple trades who may not be aligned on air-barrier continuity or even a trades team whose work you’re not intimately familiar with.
Airtightness issues happen even in very well-managed projects.
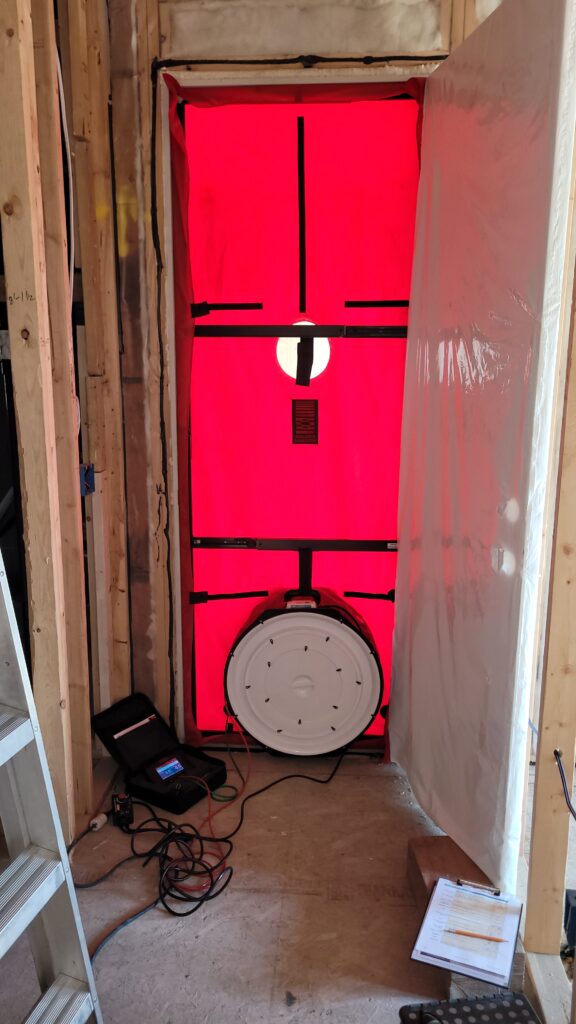
What the Test Looks Like on Site
Your Energy Advisor will:
• Set up the fan in an exterior door
• Measure baseline pressure
• Depressurize (or pressurize) the home
• Check for leakage around windows, rim joists, mechanical penetrations, and air-barrier seams (any and all penetrations).
• Trouble shoot with completing minor air-sealing measures, provide air leakage results to on-site contact (usually insulator) and a list of recommended fixes.
The process usually takes up to 2 hours for the on-site portion. (there’s then in-office file offloading, updating of models and completion of reports).
The Bottom Line: Not worth skipping
The mid-construction blower door test in BC is one of the smartest investments you can make on a new build.
Saving ~$350 now is not worth risking:
• drywall removal
• delays in occupancy
• re-inspection fees (A second site-visit and As-Built Test by your Energy Advisor because the first didn’t pass, will be associated with a fee)
• an unexpected AeroBarrier bill
For most homeowner-builders, skipping the mid-con test is the most expensive “savings” they will ever make.
Any other questions on Mid-Construction Blower Door Testing that we didn’t cover here? Reach out.