If you’re building a new home in BC, your Energy Advisor will provide you with a Pre-Construction Step Code Compliance Checklist to include as part of your permit package. Most homeowners glaze over this document, see a lot of numbers, and hope someone else understands what it is they’re looking at. If that’s you, you’re far from alone. This document was originally written for building officials, but it’s helpful for you as a homeowner to understand too.
Let’s walk through how to understand your checklist, what matters most, and when you should reach out to your Energy Advisor (EA) if anything about your home design changes. We have personally seen projects go very wrong when people change plans and don’t check with the EA first.
What the Checklist Is and Why It Matters
The Step Code Compliance Checklist is a summary of the results from your proposed home’s energy model. The model predicts how your home will perform in terms of airtightness, insulation, mechanical systems, windows and overall energy consumption. Your applicable Authority Having Jurisdiction (AHJ) will use this document to confirm your home meets BC Energy Step Code requirements before issuing a permit.
Required currently for homes in BC is to meet Step 3 parameters (some municipalities have opted to require higher steps), while in most jurisdictions, optional is to meet Step 4 or 5 to access rebates through Fortis BC.
For you, the homeowner, the Pre-Construction Compliance Checklist is a roadmap. It shows what your home was designed to meet.
If you or your builder change something about the home after the Pre-Construction Compliance Checklist is complete and confirmed to be accurate to your plans, your Energy Advisor needs to know so the model is updated to stay accurate.
Should the window/door dimensions and numbers change, ceiling heights change, window specifications change, you may reach the end of your project and be in the costly predicament of realizing that your project didn’t meet the requirements after all. Then what?
We have come across Builders and Homeowners who are very proactive and will reach out to confirm every single detail (better to check when not needed than to think it won’t matter and find out later, it does), and others who will make all sorts of changes without checking in first and then find themselves in hot water at the end of the build when the project doesn’t meet the requirements.
That said, let’s take a look through each section of the report one at a time.
Section A: Project Information
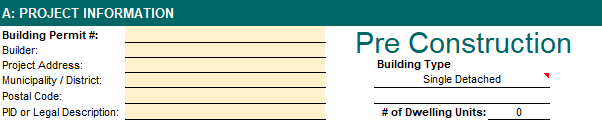
This section lists the basics: your project address, builder, Municipality/District, permit number and the date the model was completed.
If any of this is incorrect when you receive your reports, advise your EA. Permits can be delayed if the clerical information doesn’t match your application. Building permit number usually doesn’t need to be listed, but the address, and other details like Municipality/District should be correct. Your address may be in “Kelowna” but if your AHJ is actually the RDCO, it needs to be listed on your Compliance Checklist correctly.
Section B: Step Code Compliance Summary
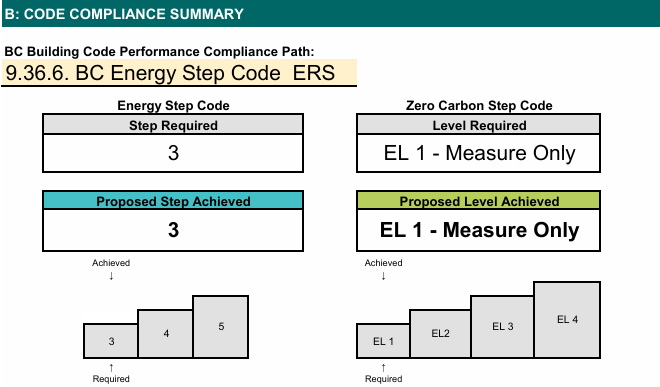
This is the part most homeowners look for first. It shows the Step Code level required by your municipality and the Step Code level achieved based on your design.
For example below, the City of West Kelowna requires Step 3, and the model shows the home achieves Step 3.
If the proposed house falls short, design changes are needed before submitting for permit. This can happen via many approaches, considering what the most cost effective solution is and trying that first to see if the change is enough to inch over the required parameters’ threshold.
You never HAVE to install triple glazed windows, or do exterior insulation, etc. BUT if the proposed home has a high ratio of glazing to wall area, you’ll have trouble meeting the requirements without installing better performing windows. This is due to the fact that a lot of the envelope will likely have an R value between 2.8-3.3 (using double-glazed windows) compared to a framed wall containing R22 batt insulation. There is huge difference in heat transfer between an R3 window and an R22 wall.
Section D: Building Assemblies and Mechanical Systems
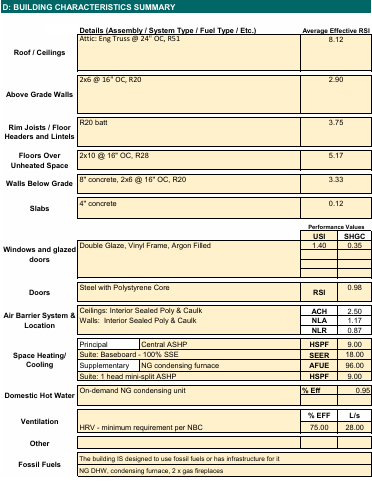
This section summarizes the building assemblies and equipment used in the model, including:
- Attic insulation levels
- Wall and floor insulation levels & structural details
- Window performance (USI and SHGC)
- Airtightness target (2.5 ACH for Step 3, 1.5 ACH Step 4, 1 ACH Step 5)
- Any fossil fuel systems included
- Water heating type and efficiency
- HRV specifications, if applicable or other ventilation
- Heating & Cooling equipment
The points to pay attention to here are… the R values! It doesn’t matter so much if you change from batt insulation to spray foam of the same nominal R value (unless we are really tight on passing, then we may want to check this change), but if your attic changes from R60 to R40, let your EA know.
If your window installer originally quoted 1.26 U-value windows and then offered you a much better deal on windows with 1.45 U-value specifications, let your EA know. (higher U-value specifications are of less efficient performance, thus a 1.26 U-value window is better performing than one of 1.45 U-value)
If you remove windows from the plan or change the dimensions of the existing windows, let your EA know.
If the framers came in, misunderstood and framed all the walls at 16″ OC spacing rather than the 24″ OC that was originally planned, let your EA know.
These are not small changes, though they sometimes seem like it. They all directly affect your Step Code Compliance Checklist results and could be the difference between a pass or fail.
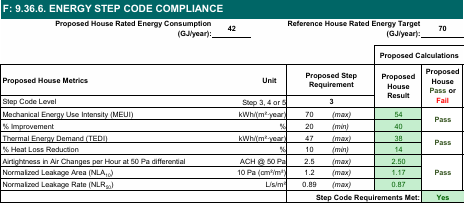
Section E & F: Energy Performance and Step Code Results
These sections show how your home performs compared to the “Reference House” (What is the reference house? – see next section). Sections E and F are two different compliance pathways. Your home doesn’t need follow both of these paths, showing compliance, just one or the other. If you’re following Step Code, as most people will, 9.36.6. is the section that needs to be filled out.
Here you’ll note terms like:
- Energy consumption in GJ/year for your proposed home as well as that of the reference house
- MEUI (Mechanical Energy Use Intensity)
- Percent improvement (over reference house)
- TEDI (Thermal Energy Demand Intensity)
- Airtightness targets in ACH, normalized leakage area (NLA), or normalized leakage rate (NLR)
You do not need to memorize any of this. What matters is simply whether the model shows “Pass,” which it does in the example above.
Each category or compliance parameter has 2-3 categories of measure, of which the proposed home needs to meet one. These varied parameters favour homes differing sizes. For example: on the air tightness parameter, ACH favours larger homes, while the NLA or NLR will be easier targets for small spaces like carriage homes to meet.
Ok now….
What is the reference house?
In BC Energy Step Code, the “Reference House” is a baseline model of your proposed home. It is used to compare the energy performance of the actual design (the “Proposed House”) against a standardized version built to the minimum code requirements, laid out in the National Building Code.
The Reference House is a computer-generated model of your home that:
- Has the same size, shape, orientation, windows, rooms, and layout as your actual design
- Uses minimum code-required insulation levels, mechanical equipment, and airtightness
- Reflects a generic building built to prescriptive BC Building Code standards, not the upgraded version you’re building
Your home needs to perform better than this baseline version by a prescribed percentage or value to comply with BC Step Code’s performance thresholds.
Why the Reference House Exists
It gives every builder and homeowner a fair and consistent benchmark, because:
- Bigger homes get bigger reference homes
- Homes with lots of glazing get reference homes with the same glazing
- Your design is judged against itself built to minimum building code
This avoids unrealistic comparisons between homes of different types.
How It’s Used
The Energy Advisor’s model will calculate both:
- Reference House (baseline performance)
- Proposed House (your intended build)
The Step Code requirements are met when the Proposed House shows sufficient improvement over the Reference House in terms of metrics like:
- MEUI (Mechanical Energy Use Intensity)
- Percent Reduction in Energy Use
- TEDI (Thermal Energy Demand Intensity)
- Airtightness performance
A Simple Example
If your Reference House uses 100 GJ/year, and your proposed design uses 70 GJ/year, then:
- You have a 30% reduction in energy consumption
- On the MEUI parameter, this represents a pass for Step 3, as the requirement is a 20% reduction in energy consumption.
Section G: Zero Carbon Step Code (if applicable)
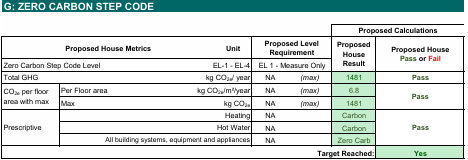
Some municipalities are beginning to adopt the Zero Carbon Step Code – read our blog post on this here. This section shows whether your home is using fossil fuels and how the predicted carbon emissions compare to the allowable targets. Depending on the step required by the municipality, this may affect how the home, and hot water are allowed to be heated as well as which cooking appliance can be installed. Check with your EA to find out if Zero Carbon Step Code beyond “EL-1 Measure Only” applies in your region.
The Most Important Takeaway: Tell Your Energy Advisor If Anything Changes
The biggest pitfalls happen when something changes during construction and the EA is not notified. Examples include:
- Changing the window package (manufacturer or supplier not important, window specifications very important)
- Downgrading or changing mechanical systems
- Adding a suite that wasn’t in the original design or adding/removing a connecting door between the suite and main house.
- Modifying insulation levels
- Switching from heat pump to gas furnace or vice versa
Energy Advisors can usually update the model quickly, but only if they know the changes were made.
In cases where there are extensive changes to the original plan, extra charges may apply as this can be a very time consuming endeavour to recalculate floor areas, wall areas, volume changes, or re-measure and enter window dimensions.
Think of the Step Code model like a living document. It only stays correct if all the details match the actual build.
Final Thoughts
The Step Code Compliance Checklist may look technical, but it’s simply a summary of how your home was designed to perform. When you understand the big picture, it becomes a useful tool for keeping your build on track.
The best thing you can do as a homeowner is stay in touch with your Energy Advisor and let them know whenever plans change. The result is a smoother construction process, a more efficient home and fewer surprises at the final inspection.
If you have any questions about your Pre-Construction Compliance Checklist that we didn’t answer here – reach out. We’re always happy to give/find more information.
